Post-FOMC / Post-CPI Trading Playbook: How to Trade the 30–180 Minutes After the Release Without Getting Chopped
Most traders treat FOMC and CPI days like a forced choice: either chase the first spike or sit out entirely.
That is the wrong frame.
The first move after a major U.S. release can be violent, fast, and expensive to trade poorly. Spreads widen. Stops slip. Price can surge, reverse, and surge again. But that does not make the whole session unusable. It usually means the opening burst is the worst place to demand clarity.
A better question is not, “Can I predict the number?” It is, “What is price doing once the first reaction has had time to settle?”
On many event days, the cleaner opportunity comes later, when the initial shock gives way to something more useful: structure.
This playbook is built for that window. Not the first few seconds. Not hindsight. The 30–180 minutes after the release, when price either starts accepting the move or fails back through it.
Post-FOMC and post-CPI trading is not about predicting the number
Why the first move is often a liquidity event, not a clean signal
The first move after FOMC or CPI is often treated as the direction. Sometimes it is. Often, it is not.
At release time, the market is absorbing new information, triggering clustered stops, repricing rates, and dealing with thinner execution conditions at the same time. The result can look decisive while actually being a fast liquidity event. Price runs through obvious levels, clears resting orders, overshoots, and only then starts to show the real auction.
That does not make the first move meaningless. It makes it unreliable on its own.
This is where many retail traders get trapped. They enter where execution is worst and information is weakest. They chase the first candle, use normal-day stop logic in abnormal conditions, and get chopped before the session has even decided what it wants to do.
What changes in the 30–180 minute window
Later in the session, some of those distortions begin to ease. Not always, but often enough to matter.
Spreads can normalize. The initial impulse becomes measurable. Early highs and lows turn into useful reference points. Retests become easier to define. Most importantly, price starts answering a better question: is the market accepting the move or rejecting it?
That is the difference between volatility and clarity. A market can move a lot without offering tradeable structure. Movement alone is not enough. You want movement that starts to hold.
One nuance matters here: CPI and FOMC are not the same kind of event. CPI is often a sharp data shock, though revisions, core readings, and components can reshape the second move. FOMC can unfold in stages through the rate decision, statement, projections, and sometimes the press conference. If another volatility wave is still ahead, your “post-release” setup may still be early.
The core idea: trade acceptance, not the headline spike
Impulse, rejection, and range acceptance in plain English
A simple way to think about event-day structure is this:
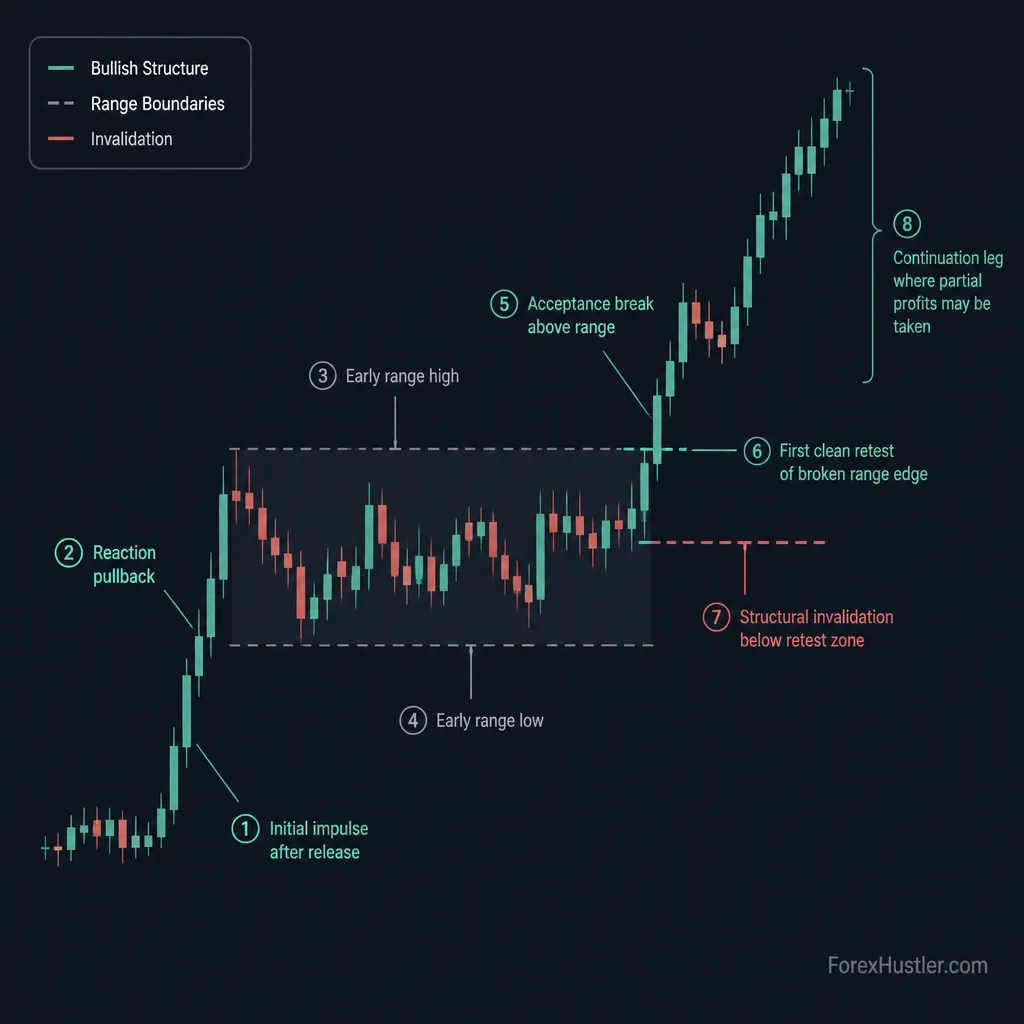
Impulse -> reaction -> range definition -> acceptance or rejection
The impulse is the first aggressive move after the release.
The reaction is what happens when that move meets profit-taking, opposing flows, or simple uncertainty.
Then a range begins to form. That range matters because it gives you boundaries. Once you have boundaries, you can stop guessing and start judging.
Acceptance means price breaks beyond an important area and actually holds there. Not just one dramatic candle. A hold. A retest. Less violent snapback. Some evidence that participants are willing to do business at the new level.
Rejection is the opposite. Price breaks, fails, and drops back through the level.
What stable post-event structure looks like
A stable post-event structure usually has a few traits:
- A visible early high and low
- Less chaotic back-and-forth after the first burst
- A break that holds longer than a few random candles
- A retest that does not fail immediately
- A clear invalidation point
If those elements are missing, you may be looking at noise dressed up as opportunity.
A step-by-step playbook for the post-release range
Step 1: Let the initial impulse print
Do nothing at first.
That sounds passive, but on news days it is often the highest-quality decision you make. Let the first impulse and immediate reaction print. You are waiting for the market to show where the emotional burst ends and where real structure might begin.
For many retail traders, the 5-minute chart is more useful than the 1-minute here. The 1-minute can help with precision, but it also magnifies noise. If every wick is pulling you in, zoom out.
Step 2: Mark the first meaningful high and low
Once the initial move and reaction are visible, mark the early range.
Not every tiny fluctuation. You want the first meaningful high and low the market is respecting after the initial shock. On a CPI day, that may form fairly quickly. On an FOMC day, it may take longer, especially if the press conference is still ahead.
Those levels become your map. Without them, you are trading narratives. With them, you are trading reference points.
Step 3: Watch for acceptance inside or outside the range
Now you watch behavior.
If price breaks above the range and stays above it, that suggests bullish acceptance. If it breaks below and holds below, that suggests bearish acceptance.
If it breaks and snaps back immediately, that is not acceptance. That is failure.
One candle close outside the range is usually not enough. You want context: follow-through, less violent snapback, and evidence that the market can hold outside the area instead of merely touching it.
Step 4: Wait for the first clean retest
This is where many traders lose discipline.
They see the break, feel late, and chase it. On event days, that often means buying into expansion or selling into exhaustion.
The better trade is often the first clean retest.
A clean retest might look like this:
- Price breaks above the range
- Pulls back toward the broken range edge
- Counter candles are smaller or less aggressive
- A rejection wick forms, or price reclaims the level and holds
- Follow-through resumes in the breakout direction
You are not trying to be first. You are forcing the market to prove it can defend the level.
Step 5: Define invalidation before entry
Invalidation should be structural.
If you are buying a bullish post-news hold above the range, your invalidation usually sits where the bullish acceptance story clearly fails, often back inside the range or below the defended retest zone.
If you are shorting a failed upside impulse, invalidation usually belongs above the level that price failed to hold.
This is where event-day discipline matters. A stop is not good because it is tight. It is good because it makes sense. If the structure requires more room, give it more room and reduce size. If you refuse to reduce size, you are not managing risk. You are negotiating with it.
Step 6: Manage the trade with partials and realistic expectations
Event-day moves can trend beautifully. They can also snap back hard.
That is why partial profit-taking often makes sense here. Taking some size off into expansion can reduce pressure while leaving a smaller runner if acceptance continues.
That said, partials are not magic. They are a trade-off. You reduce psychological stress and lock something in, but you may also trim too much if the move trends cleanly.
A practical approach:
- Take partials at the first obvious expansion
- Trail the remainder only if price keeps accepting the move
- Exit fully if the market falls back into unstable rotation
Risk management changes on news days
Why smaller size often matters more than tighter stops

This is the part many traders get backward.
On normal days, a tight stop can be efficient. On FOMC or CPI days, a tight stop can simply convert noise into guaranteed loss.
If the setup is valid but volatility is elevated, the better adjustment is often smaller size, not a tighter stop. That lets you place the stop where the trade idea actually fails.
How spreads and slippage distort normal execution logic
Around major releases, spreads can widen sharply and fills can worsen. That affects both entry and exit.
A stop that looks fine on your chart can produce a larger realized loss if liquidity is thin when it triggers. This is one reason the first seconds are so punishing for retail traders. You are not just fighting direction. You are fighting execution quality.
If spreads remain wide relative to your target, that alone can make the setup unattractive.
When wider stops are justified and when they are not
A wider stop is justified when structure requires it.
For example, if EUR/USD breaks and retests a post-CPI range edge cleanly, a stop tucked just beyond the defended structure may be reasonable, even if it is wider than your normal intraday stop.
A wider stop is not justified when it is just a way to avoid admitting the setup is messy.
If you cannot point to a specific structural reason for the stop placement, it is probably not discipline. It is hope.
Why partial profit-taking can fit event volatility
Partials make sense on event days because follow-through can be real but unstable.
You are dealing with a market that may continue repricing rates or whip straight back into the range. Locking in part of the move can make the trade easier to manage without forcing you to predict the entire path.
When not to trade the post-release move
Multiple whipsaws with no range acceptance
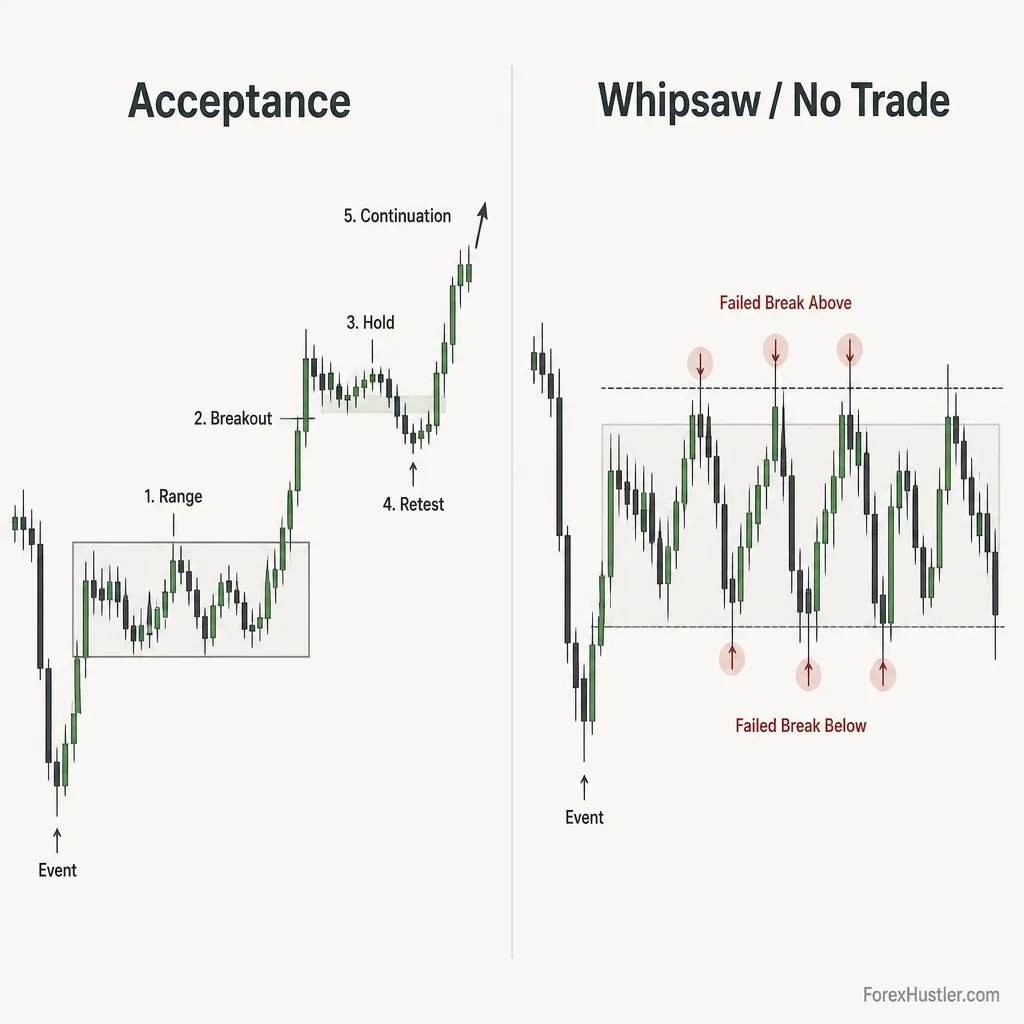
If price keeps breaking both sides of the early range and holding neither, skip it.
That is not a puzzle you have to solve. It is the market telling you price discovery is still unstable.
Key levels break and fail repeatedly
A single failed break can be informative. Repeated failed breaks usually mean conditions are too messy for clean execution.
If every breakout becomes a trap within a few candles, the session is not offering the kind of structure this playbook needs.
Price expands but does not hold any auction area
Sometimes the market runs far but never builds a usable area of acceptance.
That is an important distinction. A session can look directional in hindsight and still be untradeable in real time because it never offered a clean retest or sensible invalidation.
You cannot define invalidation cleanly
If you do not know where the trade is wrong, you do not know what trade you are in.
That alone is enough reason to stay out.
Pair selection matters more than most traders think
Why major USD pairs often provide cleaner structure
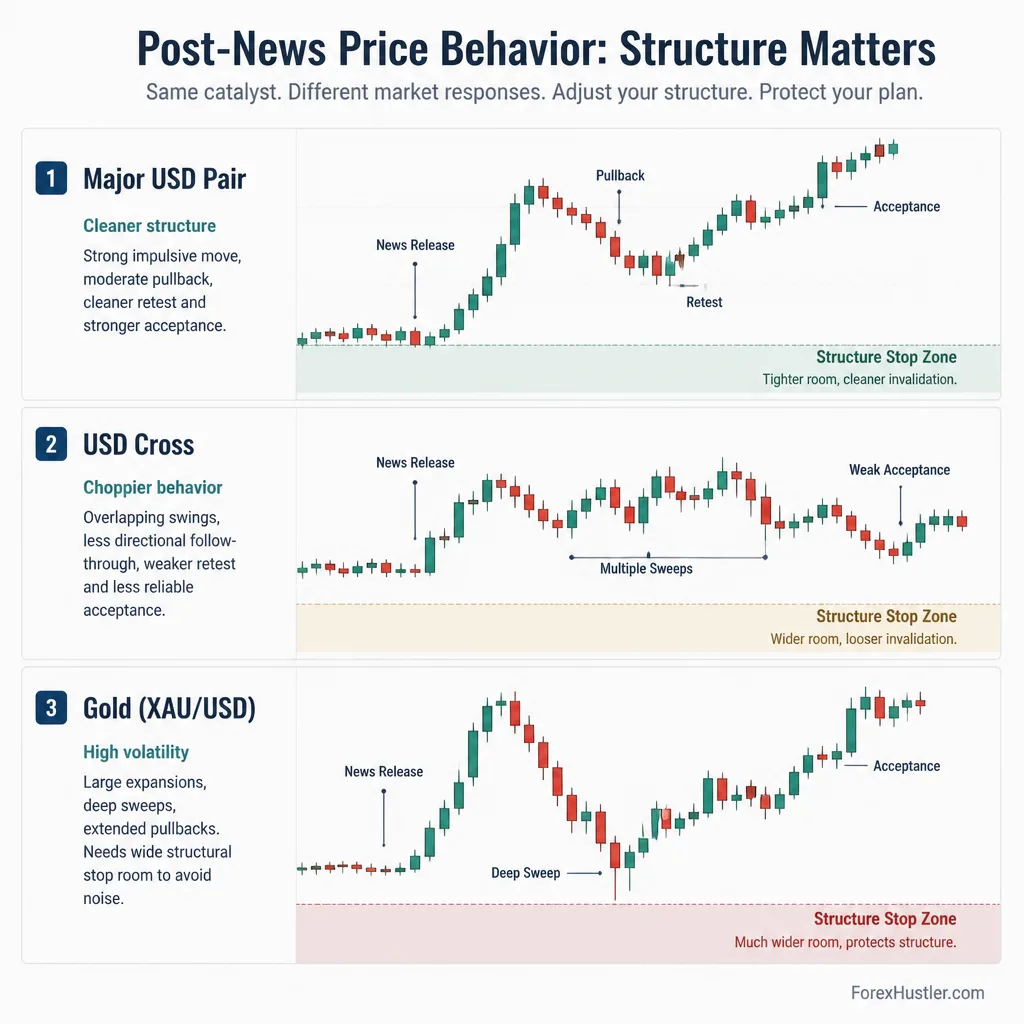
If the event is U.S.-centric, major USD pairs often offer the clearest read because they are tied directly to U.S. macro repricing and usually have deeper liquidity.
For many retail traders, EUR/USD and USD/JPY are common starting points. GBP/USD can also work, but it often stays unruly longer.
Why USD crosses can stay messy longer
Crosses can stay messy because you are not just trading the USD reaction. You may also be inheriting unrelated drivers from the other currency.
That extra layer can make post-news structure less straightforward. Cleaner on paper does not always mean easier in practice, but direct USD pairs usually give you fewer moving parts.
Why gold needs different stop logic
Gold is a different animal.
XAU/USD often reacts sharply to U.S. rates, real-yield expectations, and USD repricing, but its intraday swings can be much larger than those of major FX pairs. A stop that makes sense on EUR/USD may be unrealistically tight on gold.
That does not mean gold is a bad choice. It means your expectations have to change.
| Instrument type | Typical post-release behavior | Stop logic | Best fit |
|---|---|---|---|
| Major USD pairs | Often cleaner structure, though still volatile | Moderate structural stops | Most traders |
| USD crosses | Can stay messy longer due to added drivers | More caution required | Selective traders |
| Gold (XAU/USD) | Fast expansions, deeper sweeps, larger ranges | Wider structural stops with smaller size | Experienced event-day traders |
A realistic example of the setup in action
Bullish acceptance scenario
Imagine CPI comes in softer than expected. EUR/USD spikes higher immediately.
You do nothing.
The first 10–20 minutes print a strong impulse, then a pullback. Price forms an early range. The high is set by the initial spike. The low is set by the first meaningful pullback that holds.
Then price breaks above the early range high. This time it does not collapse immediately. It holds above the level on the 5-minute chart and pulls back in a more controlled way than the initial burst.
Now you care.
The retest comes back into the broken range edge. Selling pressure looks less aggressive. A small rejection wick forms. The next candle holds above the level.
That is your decision point.
Invalidation sits back inside the range, where bullish acceptance would clearly be failing. Because volatility is elevated, size is reduced. The first partial comes into the next expansion leg. The rest stays on only if price keeps building above the breakout area.
Failed impulse and reversal scenario
Now flip it.
CPI hits hot. EUR/USD drops hard on the first move. Traders chase the breakdown.
Then price stops extending. It rebounds into the range, starts rejecting further downside, and reclaims the broken area. What looked like immediate bearish continuation starts to resemble a failed impulse.
The key clue is not the bounce itself. It is the failure to hold lower.
Once price breaks back into the range and later retests the failed breakdown area from above, the short thesis is weaker. If the reclaim holds and downside follow-through keeps failing, a reversal trade may become the cleaner setup.
This is exactly why the first move should not be treated as direction by default.
The real edge is having rules for the part most traders treat as random
The edge here is not speed. It is selective participation.
Yes, you will miss some one-way moves by waiting. That is part of the trade-off. Some professional traders do trade the first seconds successfully, but that game depends on preparation, execution quality, and tolerance for slippage that many retail traders simply do not have.
What this framework buys you is not certainty. It is better decision quality.
A simple checklist helps:
- Know whether the event is CPI, FOMC statement, or FOMC plus press conference
- Let the initial impulse and reaction print
- Mark the first meaningful post-release range
- Ask whether price is accepting outside the range or failing back into it
- Wait for the first clean retest
- Define invalidation before entry
- Reduce size if the stop must be wider
- Check spreads before entering
- Skip the trade if whipsaws continue or a second catalyst is still ahead
Conclusion
You do not need to predict FOMC or CPI to trade those days well.
For most traders, prediction is the least useful part of the process. The better opportunity often comes later, after the first rush, when price starts revealing whether the initial move is being accepted or rejected.
The playbook fits in one sentence: wait for structure, trade acceptance, and stand aside when the auction stays unstable.
Missing the first spike is not failure. Waiting until the market can actually hold a level is often the more professional decision.
FAQ
What is a post-FOMC or post-CPI trading strategy?
It is a framework for trading after the initial reaction to a major U.S. release instead of trying to catch the first spike. The focus is on how price behaves once early volatility starts to form a range, show acceptance, or fail back through key levels.
Why is the first move after FOMC or CPI often unreliable?
The first move often reflects fast repricing, stop runs, spread distortion, and thin liquidity all at once. That does not mean it is always false, but it can be a poor standalone signal because price has not yet shown whether the market truly accepts that direction.
How long should I wait after the release before trading?
There is no fixed number of minutes that works every time. Many traders watch the 30–180 minute window, but the real trigger is structure quality. Wait until the initial impulse has printed, the early range is visible, and price begins to show either acceptance or rejection.
What is the post-release range?
It is the first meaningful high and low that form after the initial impulse and reaction. Those levels become reference points for judging whether price is holding outside the range, failing back into it, or offering a cleaner retest setup.
What does a clean retest look like after a news release?
A clean retest usually revisits a broken range edge or key post-news level without immediate chaotic reversal. Traders often look for reduced momentum against the move, smaller counter candles, rejection wicks, or a reclaim-and-hold pattern before entry.
Where should stop-loss invalidation go on post-news trades?
Invalidation should be structural, not arbitrary. It should sit where the trade idea would clearly be wrong, such as back inside the range after a breakout hold or back above a failed breakdown level on a reversal setup. Because event volatility is higher, position size often needs to be reduced if stops must be wider.
Why is smaller size often better than tighter stops on FOMC or CPI days?
Tighter stops can turn normal post-news noise into certain loss. On event days, spreads widen, slippage increases, and levels can be swept more aggressively. Smaller size lets the trader use a structurally sensible stop without taking outsized account risk.
When should I avoid trading after a major release?
Skip the setup if price keeps whipsawing above and below the early range, key levels break and fail repeatedly, spreads stay too wide relative to the target, or you cannot define invalidation cleanly. No-trade is a valid decision on unstable price-discovery days.
Are USD pairs better than crosses for this setup?
Major USD pairs often provide cleaner post-release structure because they are directly tied to U.S. macro repricing and usually have deeper liquidity. Crosses can stay messier longer because they may reflect both USD movement and separate drivers from the non-USD side.
Why does gold need different stop logic than EUR/USD or USD/JPY?
Gold often moves with larger intraday swings and deeper sweeps than many major FX pairs. That means stops that seem reasonable on EUR/USD may be too tight on XAU/USD. Traders often need smaller size, more breathing room, and more selective entries when trading gold after major U.S. data.
Is this approach different for CPI and FOMC days?
Yes. CPI is often a single data-shock event, though the details inside the report can change the second move. FOMC can unfold in stages through the statement, rate decision, dot plot, and press conference, so another volatility wave may still be ahead even if the first move looks tradable.
What is the main edge in the 30–180 minutes after the release?
The edge is not speed. It is selective participation once the market starts proving whether the initial reaction is being accepted or rejected. That can lead to clearer levels, better-defined invalidation, and fewer impulsive entries than trading the first burst of volatility.