The 3 Forex Strategies That Fail Most Beginners
And the Small Tweaks That Make Them More Tradable
Most beginners do not lose because they chose the “wrong” forex strategy. They lose because they trade a familiar setup without enough structure around it.
A support bounce, moving average crossover, or breakout can all look great on a chart screenshot. Live trading is less forgiving. Spreads widen. News hits. Clean-looking levels fail. Signals appear in the wrong market conditions.
That is the gap worth fixing. Not by chasing a brand-new system, but by tightening the basic strategies beginners already use. The goal is not to make them magical. It is to make them more selective, more testable, and easier to manage with real rules.
Why Familiar Forex Strategies Break Down in Live Trading
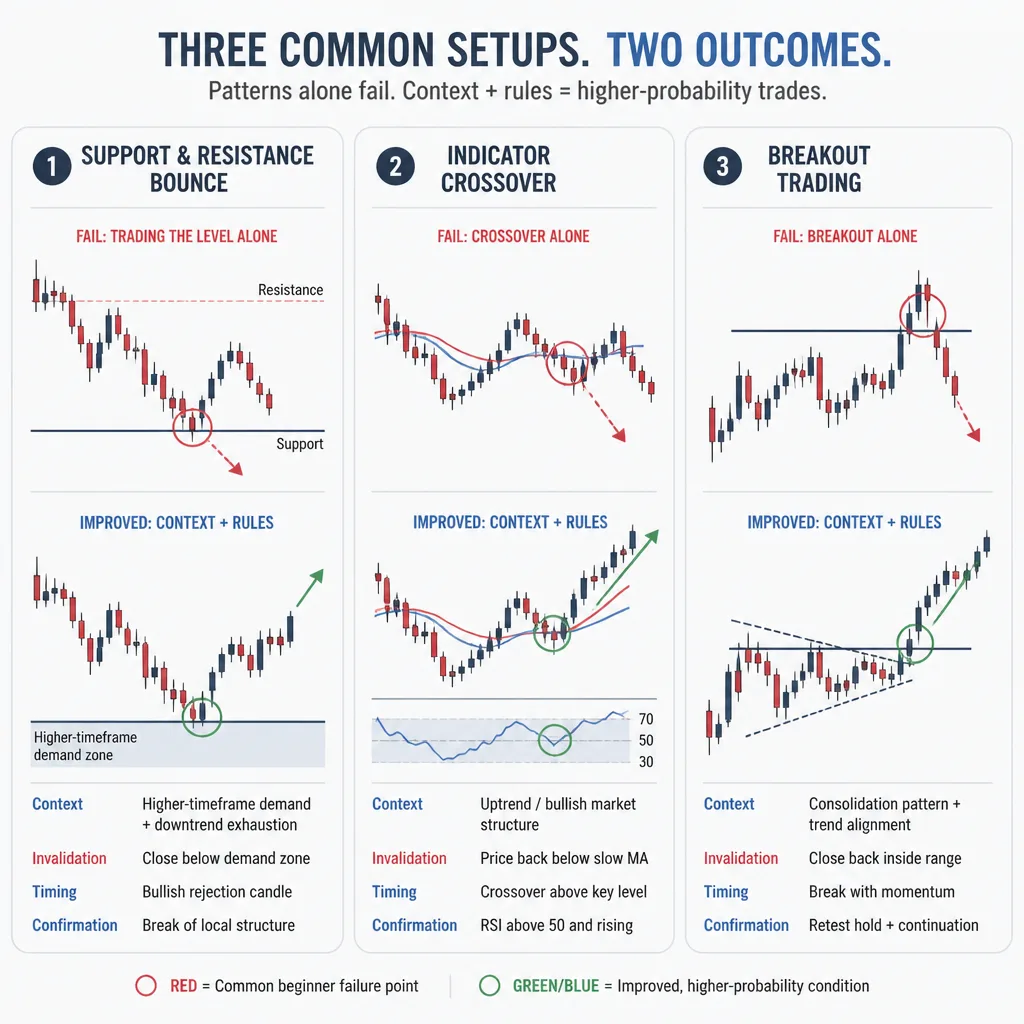
The strategy itself is rarely the whole problem.
A setup is just the pattern that gets your attention. A trade plan tells you whether that pattern is actually worth trading. That means defining:
- the market condition
- the entry trigger
- the invalidation point
- the target logic
- the risk rule
- the skip conditions
That distinction matters more than most beginners think.
A support touch is not a trade plan. Neither is a crossover. Neither is a break above yesterday’s high. Those are starting points, not complete ideas.
In practical terms, invalidation is what proves the trade idea is wrong. It is not “20 pips because that feels safe.” If you cannot explain what would make the setup fail, the trade probably is not fully planned.
The other piece beginners often miss is market regime. Keep it simple:
- Trending: price is making directional progress
- Ranging: price is moving sideways between boundaries
- Volatile: price is moving fast and unevenly
- Dead: low participation, low follow-through, messy candles
The same setup can behave very differently in each environment.
If you want the short version of why beginner strategies fail, it is this: traders enter patterns without checking whether the market fits, where the idea is wrong, and whether the timing makes the trade fragile.
1. Support and Resistance Bounce: Clear in Theory, Messy in Practice
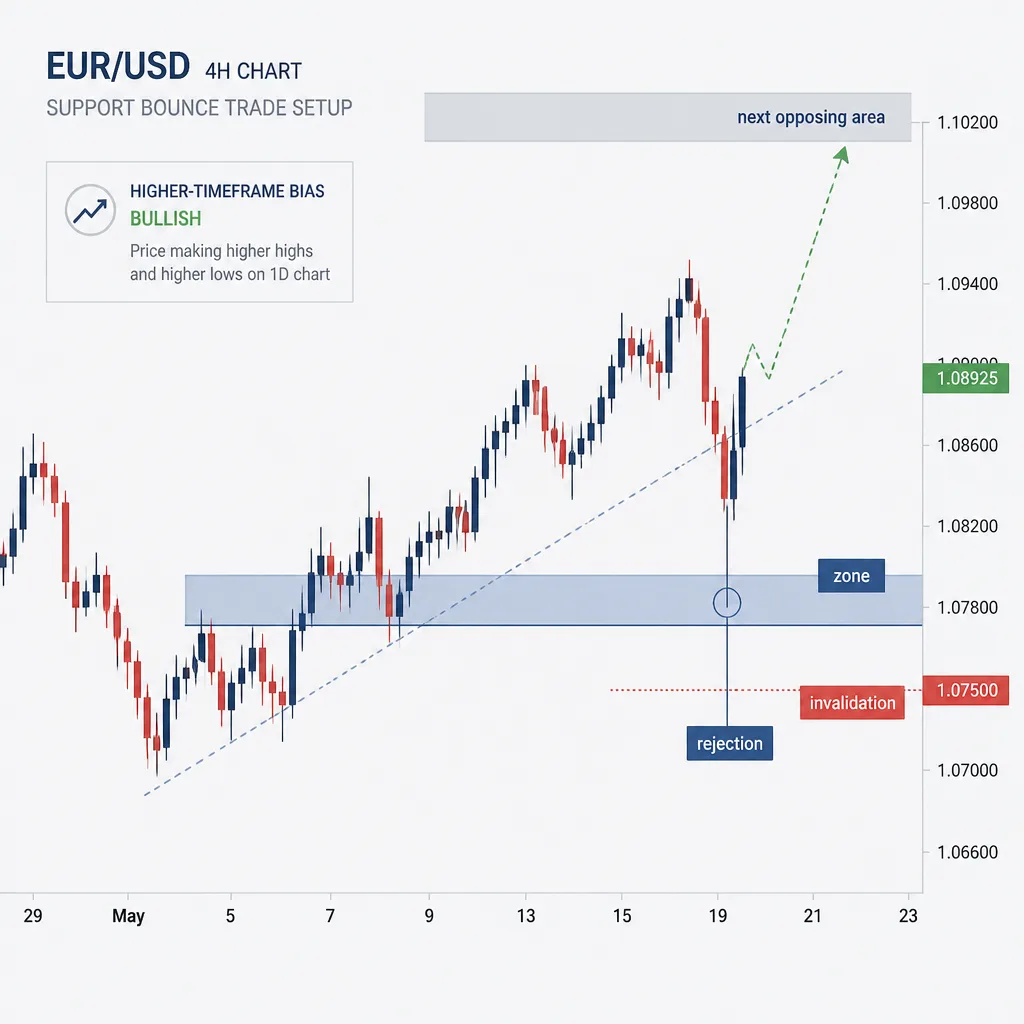
Why beginners lose: every level starts to look important
Support and resistance trading feels intuitive because it looks obvious in hindsight. Price touched a level, rejected it, and moved away.
The problem is that beginners usually mark too many levels and treat all of them as meaningful. A random pause on a 15-minute chart becomes a “zone.” Then almost every touch starts to look tradable.
That is where this setup begins to fall apart.
Failure mode: no higher-timeframe context
A lower-timeframe level can look clean while still being strategically weak.
Imagine EUR/USD bouncing from a 15-minute support zone just below a clear daily resistance area. The long signal may be real, but the space above it is limited. The trade is running into bigger structure before it has room to work.
The same problem shows up around scheduled macro events. A support bounce 20 minutes before CPI or NFP may look clean on the chart, but news can distort spreads, trigger slippage, and break technical levels that were behaving normally minutes earlier.
Failure mode: stops with no structural logic
This is one of the most common beginner mistakes.
Price often probes a zone before choosing direction. If your stop sits inside that noise, you can be right on direction and still get stopped out because the stop was placed where price naturally tests liquidity.
A stop should sit beyond the structure that invalidates the bounce idea, not at an arbitrary distance chosen to make the reward-to-risk ratio look better.
Failure mode: trading into unstable conditions
Support and resistance trades get much weaker when conditions are unstable, including:
- major scheduled data releases
- session opens with sudden expansion
- thin periods with poor follow-through
- spread widening during low-liquidity moments
The level itself is not invalid because news exists. But the trade becomes more fragile when event risk overwhelms the technical logic.
Small tweaks that help
The fixes are simple, but they matter.
First, treat levels as zones, not exact lines. Markets rarely reverse to the pip.
Second, use a higher-timeframe bias. A bounce works better when it aligns with broader structure instead of pushing straight into it.
Third, require both context and trigger. Context might be a well-tested range boundary or a pullback level in trend. The trigger might be a rejection wick, a failed break, or a lower-timeframe structure shift.
Fourth, place the stop where the idea is actually wrong. If support is supposed to hold, the stop belongs beyond the part of the structure that would show it did not.
Finally, make sure there is room to the next opposing area. A bounce with no room is often just a neat-looking entry into a bad target.
Minimum viable plan for a support/resistance bounce
Market condition: Range market, or pullback into a meaningful higher-timeframe zone within a trend
Entry trigger: Price tests the zone and shows rejection, a failed break, or a lower-timeframe structure shift
Invalidation point: Beyond the zone or recent swing that would prove the bounce failed
Target logic: Next opposing zone, recent swing structure, or a predefined reward multiple if the chart has room
Risk rule: Use fixed small account risk per trade; reduce size if the stop must be wider for structural reasons
Skip conditions: Major news nearby, bounce directly into higher-timeframe resistance or support, messy candles with no clear rejection
2. Indicator Crossover: Clean Signal, Weak Context
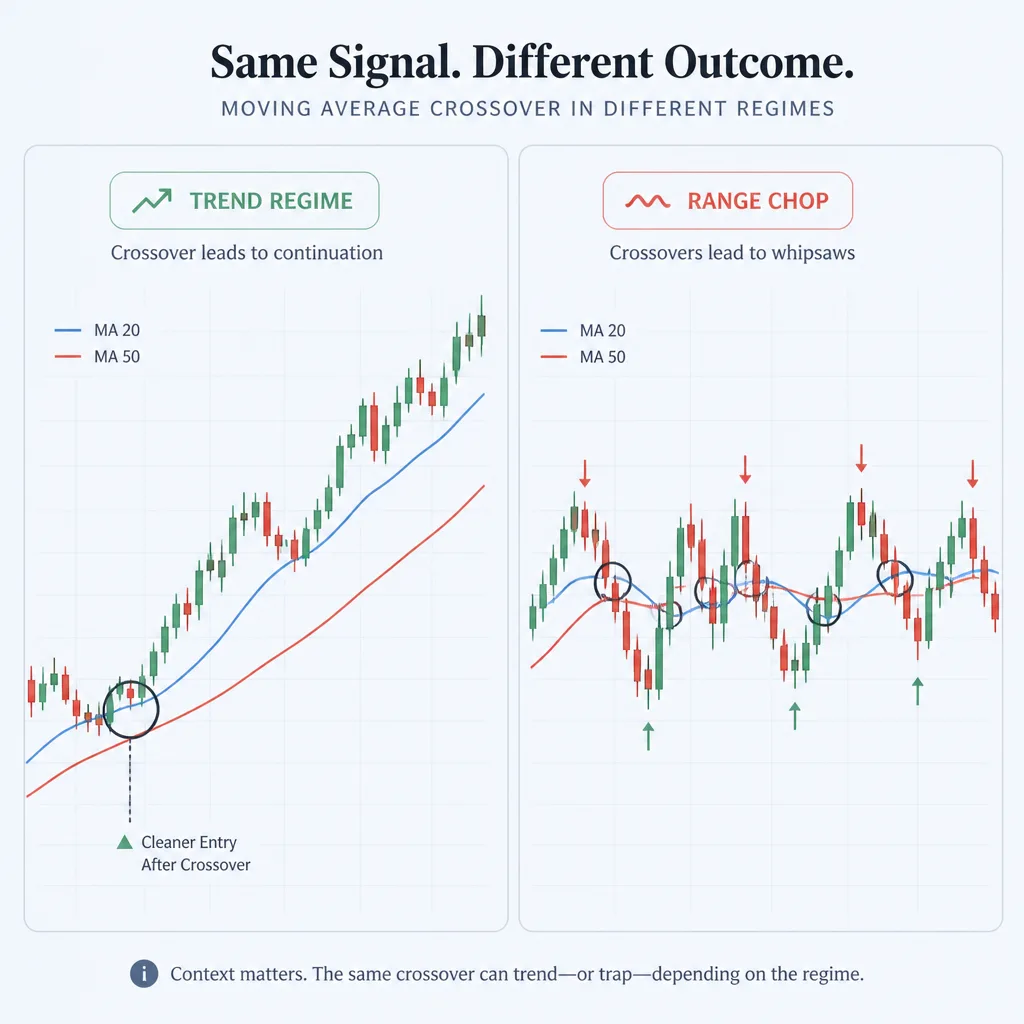
Why beginners like crossovers
Crossover systems look objective. Two lines cross, so you buy or sell.
That gives beginners a sense of certainty, but often the certainty is false. Indicators do not remove judgment. They compress past price action into a formula. The chart still needs context.
Failure mode: the signal comes late
Moving averages are lagging by design. A crossover confirms that price has already moved enough to change the relationship between the averages.
That does not make crossovers useless. It does mean they often show up late.
A bullish cross after several strong candles can be a trap if the move is already extended or heading straight into resistance. The signal is technically valid, but the surrounding structure is poor.
Failure mode: crossovers get shredded in ranges
This is where many beginners slowly bleed.
In sideways markets, price oscillates around its average. That creates repeated crosses with little follow-through. What looked like an objective signal turns into a string of small losses.
You can see this when a crossover strategy works well during a clean GBP/USD trend, then falls apart in a flat Asian-session range where candles overlap and directional progress disappears.
Failure mode: too many pairs, too many mediocre signals
A large watchlist usually lowers standards.
If you watch ten or fifteen pairs, you will almost always find a crossover somewhere. The problem is that “available” is not the same as “good.” Many beginners end up taking average signals simply because there are so many of them.
A smaller watchlist usually leads to better review and better pattern recognition.
Small tweaks that help
The first fix is a regime filter. Use crossovers mainly when market structure already suggests trend conditions. For longs, that may mean higher highs and higher lows. For shorts, lower highs and lower lows.
The second is a structure and volatility filter. If the market is flat, overlapping, and stuck near its mean, skip it. If the crossover appears with little room before a major level, skip it.
The third is entry refinement. Instead of entering the moment the lines cross, wait for a continuation close or a pullback that holds. That lowers frequency, but it can improve location.
The fourth is watchlist discipline. Two or three major pairs you know well can teach you more than twelve pairs you half-watch.
Minimum viable plan for a crossover setup
Market condition: Clear trend, not sideways chop
Entry trigger: Crossover plus continuation candle, or pullback after the cross that resumes in the trend direction
Invalidation point: Beyond the recent swing that would break trend structure
Target logic: Next major structure area or a reward multiple that still respects nearby barriers
Risk rule: Fixed small risk per trade; do not increase size because the signal feels “objective”
Skip conditions: Flat overlapping candles, crossover directly into major support or resistance, major news nearby, too little room after spread and stop placement
3. Breakout Trading: Easy to See, Easy to Trade Poorly
Why breakouts fail so often
Breakouts are emotionally powerful because they promise speed. Price clears a visible high or low, momentum picks up, and you do not want to miss the move.
That visibility is exactly what makes them dangerous.
Obvious highs and lows attract breakout traders, stop orders, and traders looking to fade an exhausted move. Price can push through the level, trigger entries, and reverse hard if there is not enough follow-through.
Failure mode: false breaks at obvious levels
A false breakout is not just bad luck. It often means price moved beyond a visible level without achieving acceptance there.
For example, AUD/USD pokes above a well-watched prior high during a quiet session, extends briefly, then slips back below the level in the next candle. That is the classic breakout trap. The level broke, but the market did not hold beyond it.
That is why entering on the first tick through a level is often too aggressive for beginners.
Failure mode: spread widening and poor fills
Breakouts usually look cleaner in chart examples than they feel in live execution.
In real conditions, spreads may widen around illiquid periods, rollovers, or major news. Slippage can make breakout entries worse than expected. That matters because breakout trades often depend on momentum. If the fill is poor, the structure can deteriorate fast.
Failure mode: weak session timing
Session timing changes breakout quality.
A breakout during active London or London–New York overlap conditions often has a better chance of follow-through than one that appears during a quiet stretch with weak participation. In forex, because the market is decentralized, it helps to think in practical terms: candle expansion, sustained movement beyond the level, and whether the move keeps going after the break.
A breakout in dead conditions is often just a temporary push into empty space.
Small tweaks that help
The biggest fix is simple: define confirmation before the trade happens.
That confirmation might be:
- a candle close beyond the zone
- sustained trade beyond the level
- a break-and-retest that holds
- clear expansion during an active session
Retest logic is especially useful for beginners. It helps avoid paying the worst price on the first spike.
Also check what sits just beyond the breakout. If price is breaking above an intraday high directly into a larger weekly resistance area, the breakout may still be valid, but the room is limited.
Minimum viable plan for a breakout setup
Market condition: Price has compressed near a clear level, or has tested the level repeatedly with signs of building pressure
Entry trigger: Candle close beyond the zone, or break-and-retest that holds
Invalidation point: Back inside the broken structure, or beyond the retest failure point
Target logic: Next major structure area, measured room from the range, or a predefined reward multiple if there is clean space
Risk rule: Fixed small account risk; account for spread and possible slippage when sizing
Skip conditions: Quiet session, breakout during major news, breakout directly into higher-timeframe structure, spike through the level with no acceptance
What These Three Strategies Have in Common
A setup is not a plan
This is the thread running through all three.
“Support bounce,” “crossover,” and “breakout” are labels. On their own, they are not enough. A setup becomes tradable only when the surrounding rules are clear.
A usable trade plan answers six questions:
- What market condition does this setup belong in?
- What exactly triggers the entry?
- What invalidates the idea?
- Where is the target, and why?
- How much is at risk?
- When should the trade be skipped?
If those answers are vague, the strategy will feel inconsistent even if the core idea is reasonable.
The details that usually decide the outcome
Beginners often ignore the details that separate a solid trade from a fragile one:
- higher-timeframe alignment
- session timing
- news risk
- room to the next structure
- stop placement tied to the chart
- spread and slippage awareness
- watchlist discipline
None of these guarantee results. They just remove a lot of avoidable low-quality trades.
Fewer trades usually mean cleaner feedback
One of the harder lessons in forex is that more signals usually do not help beginners.
They usually create noise. You take too many setups, in too many conditions, across too many pairs, and then you cannot tell what is actually failing. The strategy? The session? The stop logic? The timing? Your own impulse?
Fewer trades create cleaner feedback.
A Practical Next Step
Pick one setup, one market condition, one review process
Do not leave this article and add three more indicators.
Choose one of the three setups above and narrow it further.
For example:
- support bounce only in ranges or trend pullbacks
- crossover only in clear trend structure
- breakout only during active sessions with close confirmation
Then trade that one idea in one defined condition long enough to review honestly.
That is how you start separating a weak strategy from weak execution.
What to track before changing anything else
Before you switch systems again, journal these basics for every trade:
- setup type
- pair
- timeframe
- market regime: trending, ranging, volatile, or dead
- session
- news context
- entry trigger used
- invalidation logic
- target logic
- whether the trade followed the plan
- screenshot before and after
- brief note on what actually happened
This is where useful self-diagnosis starts.
If you cannot state the condition, trigger, invalidation point, target logic, and skip rule in one sentence each, the trade idea is not ready yet.
Final Thought
Most beginner forex strategies are not broken. They are incomplete.
Support and resistance bounces fail when every level is treated as meaningful, stops are placed without structure, and context is ignored. Crossovers fail when lagging signals are traded in chop as if they were trend tools. Breakouts fail when a brief push beyond an obvious level is mistaken for real acceptance.
The encouraging part is that the fix usually is not a brand-new system. It is tighter execution, better context, clearer invalidation, smarter timing, and fewer trades.
That will not remove losses. Nothing does. But it can make a familiar strategy more selective, more testable, and much easier to review without fooling yourself.
FAQ
Why do beginner forex strategies fail in live trading?
Usually because traders use a setup idea without a full trade plan. The biggest problems are weak context, poor invalidation, bad timing, and inconsistent risk control.
What is the difference between a setup and a trade plan?
A setup is the pattern that gets your attention, like a bounce, crossover, or breakout. A trade plan adds the rules that make it tradable: market condition, entry trigger, invalidation point, target logic, risk size, and skip conditions.
Why do support and resistance bounce trades fail so often?
Beginners often treat every line as tradable, ignore higher-timeframe context, place stops too close, and enter just before major news or into nearby opposing structure.
How should support and resistance be traded more carefully?
Treat levels as zones, not exact lines. Use higher-timeframe bias, require a rejection or structure-based trigger, and make sure there is enough room to the next opposing area.
Why do indicator crossover strategies give poor entries?
Because crossover signals lag by design. They can appear after the move has already expanded and tend to get chopped up in sideways conditions.
How can beginners improve a crossover strategy?
Use it mainly in trending conditions, avoid signals near major support or resistance, and consider waiting for continuation or a pullback after the crossover instead of entering immediately.
Why do breakout trades produce so many false breakouts?
Obvious highs and lows attract both breakout traders and traders looking to fade exhausted moves. Price can push through the level briefly, trigger entries, and then reverse if there is not enough follow-through.
What makes a breakout setup more tradable?
Session timing, confirmation, and retest logic. A breakout is usually cleaner when it happens during active trading hours, holds beyond the level, and shows acceptance instead of a brief spike.
What does invalidation mean in forex trading?
Invalidation is the price behavior or market condition that proves the trade idea is no longer valid. It should be tied to market structure, not an arbitrary number of pips.
What should a beginner include in a simple forex trading plan?
At minimum: market condition, entry trigger, invalidation point, target logic, risk rule, and skip conditions.
How many currency pairs should a beginner watch?
Usually fewer than they think. Watching too many pairs often lowers standards and leads to mediocre entries. A small watchlist makes it easier to recognize conditions and review mistakes.
Can these small tweaks make a forex strategy profitable?
Not automatically. They can make a strategy more selective, more testable, and easier to manage, but they do not remove losing trades and they do not guarantee results.